Sunday, August 30, 2009

Guest Post - Pasta Raphael


Remember my sister's Guest Blog Number One? Well today I'm introducing you to another guest blogger. This time, though, you've met this woman before. Her recipes have been featured numerous times, and I know you've all been waiting for another. I asked both of the guest bloggers to prepare their posts awhile back so this entry has been on deck for a couple of weeks now. Now as you're rushing to make the best of all the last of the summer produce, today's recipe is perfectly timed. So before you begin pulling out your shopping bags, let me introduce you to my mother, who will having you reaching for those ripe tomatoes and the fresh basil here in the last days of the season. From here on out it's in her words.


The title banner of this blog states that it is written by ex college students. Let's just get this out in the open right away. As Lindsay's mom, I must confess that I am more an ex, ex...maybe even another ex...college student. So how great is it that my daughter invtes me to guest blog? I will also confess, that I think (hope?) it is from me that Lindsay gets her foodie tendencies, and her healthy eating habits. (All that hand-ground organic baby food paid off!) I have often shared with Lindsay that for me, food is about much more than just satisfying our physical needs; it is about relationship. In our family, life in all of its glorious ordinariness has often taken place around the kitchen island. My own mother taught me to cook early in life by assigning me the task of planning and preparing a couple of meals a month for our family. For those of you out there who are flaming feminists as is my daughter...never fear! In my egalitarian family, this task fell to both boys and girls. As a result, my brother is a good cook as well, although his repertoire is somewhat different from mine. So Lindsay and her siblings may not have been born with a silver spoon in their mouths, but they were definitely born with a wooden spoon in one hand and a wire whisk in the other. Lindsay has mixed, stirred, and experimented in the kitchen with me ever since.

For those of us in the three-digit temperatures of Texas, this pasta
is de rigueur for those long, lazy days of summer! Paired with a crisp, tender mesclun salad and some rosemary onion focaccia bread, it is the perfect al fresco dining after the sun has set, the stars have come out, and the temperature has dropped into double digits. It is also an impressive picnic option. Just pack away in a beautiful jar, throw it in a cooler along with a fruit salad of those lucious summer fruits--think strawberries, bluberries, blackberries, watermelon, and peaches--and head for the nearest source of water. Makes me long for the beach!
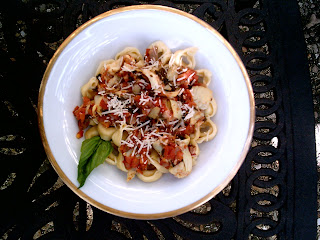

Pasta Raphael

Ingredients

-4 lbs. ripe meaty tomatoes
-2 jars (6 oz.) marinated artichokes
-1/2 cup best olive oil
-2 cups coarsely chipped yellow onions
-4 garlic cloves, peeled and finely chopped
-1 chopped chopped fresh basil
-1/2 tbsp. chopped fresh oregano (can use dried)
-1/2 cup finely chopped Italian parsley
-1 small dried red pepper, finely crushed
-1 tsp. salt
-freshly ground pepper to taste
-1/2 cup shredded imported Romano cheese

-your favorite pasta noodles*

Method

Bring a large pot of salted water to a boil. Drop tomatoes into the water a few at a time. Scald for 10 seconds, then remove from the water with a slotted spoon.Transfer the tomatoes to a bowl of ice water. Drain toatoes and slip off the skins. Cut crosswise into halves, squeeze out seeds and juice, and chop coarsely. Reserve.

Drain artichokes, and reserve marinade.

Heat olive oil in a large saucepan, and saute onions, garlic, basil, oregano, parsley and red peper over medium heat for 5 minutes. Add fresh cracked pepper. Add tomatoes to the sauce. Season with about 1 teaspoon salt, and simmer uncovered over medium heat for 1 hour.

After the sauce has simmered, add reserved artichoke marinade, and simmer, stirring often for another 30 minutes.

Stir in artichoke meat, and continue to simmer until sauce is rich and thick--another 20 minutes or so. Stir in Romano cheese, taste, and correct seasonings. Serve over your favorite pasta
, garnished with extra shredded Romano cheese.

*If you can get it, fresh pasta
is worth the expense and trouble, but frozen is an acceptable substitute--much better than dried!

Thursday, August 27, 2009

Napa Cabbage Sesame Salad


We're back!

And it's been too long! Have I lost all of my devoted readership? Let me tell you what's up been keeping me from you.

1. A research project for my summer university
2. 2 goodbye parties for said university
3. Pizza consumed during the goodbyes
4. 1 week of cleaning out the fridge
and
5. 12 hours of tasteless, sandy airplane food + 14 hours of overpriced airport food

However, ladies and gents, now that I'm back to on dry ground, I've got no more reasons not to blog and my "to bake" list has increased by a few too many recipes. I'm visiting family in Texas, which means that I'll also have plenty of ingredients to work with. We've got some birthdays (i.e. cakes!) coming up around here, plus isn't Labor Day the best day to make really make good use of all that summer produce?

Over the next week I have another special guest joining us for a blog (did you see TMTP's first guest blog?) and I also have a short mini-series coming up. On top of that I'm planning to review a few foods and restaurants that I've tried recently.

Let me first share one of the recipes with which I was welcomed back to the Lonestar State.* We had this recipe just last night when my aunt came over for dinner. We wanted something light and fresh, and considering that it's August here in the Lonestar State,* it's really too much to ask that we heat up the house with the oven or the stove. My mom originally got this recipe from a restaurant in the Texas Hill Country, and she's since adapted it to make it even better. Napa Cabbage Sesame Salad can really be played with, and I'll offer some tips here. You can make a budget variety, a protein-boosted variety, a carnivorous variety, etc.

Napa Cabbage Sesame Salad

Ingredients
I'm giving the basic ingredients here. See below the recipe method for variations.

for the salad
1 head shredded Napa cabbage
2 oz. toasted nuts
2 oz. toasted sesame seeds
2 packages Ramen noodles

for the vinaigrette dressing
6 oz. peanut oil (that's about 3/4 cup)
6 oz. rice wine vinegar
1 oz. honey
2 oz. sesame oil
salt and pepper to taste

Method

Prepare the salad and nuts. Shred/slice the cabbage, and put it into a large bowl. Toast the nuts and sesame seeds. [Don't know how? Check out this handy chart! Sesame seeds should be toasted at 275 degrees for about 5 minutes. Make sure to give both the seeds and the nuts a few stirs during the toasting process]. Allow them to cool afterward, and put them in a medium bowl. Open the Ramen noodles. Toss the seasoning packages - you won't need them. Crumble the dry noodles into the nuts, and combine.

Make the vinaigrette. Find a jar with a tight-fitting lid. Pour all of the ingredients into it, and shake vigorously to combine. Open the jar, and season with salt and pepper.

Put together the salad. Pour the vinaigrette over the cabbage, and then add the nuts and noodles as well. Toss the salad very well, and then taste and adjust salt and pepper if necessary. This salad is good right away because the ramen will still be crunchy, but it's also good a day later because the cabbage will have become tangy and sweet after absorbing all of the vinaigrette. The cabbage will become a bit droopy though so if you're planning to serve to a group, make the salad the same day you'll be eating it.

Variations:

-Try different types of nuts: I've used cashews, pine nuts, pepitas/pumpkin seeds, and sunflower seeds. Go with sunflower seeds if you're on a budget, pine nuts if you want a classier salad, cashews if you want the nut to really absorb the dressing.

-Vary the vinegar and oil. Wok oil is a spicier sub for sesame oil, and it's a good combination with pepitas. Red wine vinegar and sherry vinegar make tarter replacements for rice wine vinegar.

-Want to make this into a meal? The original recipe called for adding strips of baked or pan-fried chicken. I add spicy soy strips to my salad. You can also add stir-fried tofu chunks. Serve with rice.

-Add a few more veggies. Water chestnuts, bamboo shoots, or slightly sauteed oyster or enoki mushrooms would be great additions.

*I don't really call it that.

Monday, August 10, 2009

Candy Sensation + Crispy Oatmeal Cookies


Any candy fans out there? I haven't yet blogged about candy, but at the behest of a friend, I'd like to introduce you to Germany's newest candy sensation:

Fresh Cola Mentos

That's right, people, Mentos has finally acknowledged in flavor form that the coolest thing about their candy is that it creates an explosion when dropped into a bottle of Diet Coke. Now you can not only wow your friends at the party with a sick Mentos/Coke show, but then you can top it all off by whipping out a roll of Fresh Cola Mentos when they're still speechless from your performance. Trust me, you'll have them coming in droves.

Now, who's going to write Mentos to tell them to start producing these in the US? Dear candy-loving friends, pull out your pens and paper and take one for the team.

And without further ado, here's one of my favorite cookie recipes.


Crispy Oatmeal Cookies
recipe from my mother
yields 3 1/2 dozen if you make golf ball-sized dough balls

Ingredients

-1 cup flour
-1/2 cup sugar
-1/2 tsp. baking powder
-1/2 tsp. baking soda
-1/4 tsp. salt
-1/2 cup brown sugar
-1/2 cup butter or butter-flavored shortening*
-1 egg
-1/4 tsp. vanilla
-3/4 cup rolled oats
-1/4 cup chopped nuts, optional
-extra sugar for dipping, optional

Method

One bowl recipe! Preheat your oven to 375 degrees. Mix together your dry ingredients, and then add the liquids and combine. Roll the dough into balls. (I always use my hands instead of spoons). Dip the tops of the balls in sugar if desired. Place the dough onto a cookie sheet or pizza stone, and bake for 8-10 minutes. 8 minutes yields slightly chewer cookies; 10 minute-cookies will be crispy. I prefer these crispy.

*Butter-flavored shortening generally is a good substitute for butter in cookies. It's not any healthier, but it's much cheaper. It tastes the same or better when used in most cookies. I wouldn't, however, use it is a butter sub in brownies, cakes, or quick breads though. Thanks to my sister's friends for scientifically verifying the aptness of this substitution. They did a whole experiment!

Thursday, August 6, 2009

Eggplant Marmalade


I don't really like eggplant. In fact I really used to hate it. Mushy pulp with slippery seeds - not for me. However, as a vegetarian, people seem to think that 1) eggplant is always a perfect substitute for meat and 2) that I love eggplant. As such, I've made it a recent mission to figure out how I can actually adopt a little affection for this vegetable.

There are two ways that I've had it and enjoyed it. First, if you've never had Saad's baba ganoush, then you are missing out on one of the main reasons that pita was invented. It's smoky and creamy, the absolute perfect combination of tahini and eggplant. Second, once I fried Indian eggplant - also good, but one can't eat fried eggplant everyday. Other than that, I've rejected all of my grilled, steamed, sauteed, and lasagna'ed eggplant attempts. So after a visit to the Turkish market last Friday, I find myself once again with a rather large eggplant sitting in my fridge. What to do? I'll admit, this baby almost became baba ganoush after a tempting offer of tahini from a friend, but I had no lemon juice. The thought of slicing it made me think of all the tough and bitter eggplant I've ever had. Not happening.


Then I stumbled upon this eggplant marmalade recipe, which I altered using a few different vegetables and cooking techniques. This, my friends, is eggplant heaven. In a only a few steps, you can transform baked eggplant into pasta sauce, sandwich filling, vegetable dish heaven! Also, added bonus - it's a budget recipe!

I've got a lot more eggplant experimenting to do, but for now, I bring you eggplant marmalade, my first real e-plant success. For tips on how to use it and how much to make, see the text below the recipe.


Eggplant Marmalade
yields about 1 cup, depending on the size of your vegetables

Ingredients

-1 large eggplant
-1 medium yellow onion, diced
-1/3 cup black olives, coarsely chopped
-2 medium tomatoes
-approx. 2 tbsp. olive oil
-3 cloves of garlic, minced
-salt and pepper to taste

Method

Preheat your oven to 450 degrees. Once the oven is hot, place the eggplant on a cookie sheet, and bake until soft and collapsed. (In order to prevent messiness, you can line your cookie sheet with foil). The baking took me about one hour. Once you've finished baking the eggplant, remove it from the oven, and allow it to cool for about 10 minutes. Then slice the eggplant, and scoop out all the flesh with a spoon. In a bowl, mash the eggplant with a fork. Don't worry if it's still stringy, you will cook it down in a moment. Set the eggplant aside.

Bring a medium pot of water to boil on the stove. Score the tomatoes with an "x," and drop them into the water. Cook the tomatoes for about 3 minutes. Then remove them from the water, plunge them under a cold faucet, and peel the skins off. Cut the tomatoes into 1-in chunks, and let them drain in a colander. Meanwhile, dice the onion, and saute it in a medium saucepan for about 5 minutes in a glug of hot olive oil. (You'll want to have a little more oil on hand to mix in later). While you are cooking the onions, dump out the water you boiled the tomatoes in, and return the tomatoes to this same pot. Cook them over a low heat with a dribble of olive oil. Stir them frequently. You'll want to cook out most of the liquid from the tomatoes. Add a dash of salt to speed up the process.

In the other pot, after the onions have browned for a few minutes, reduce the heat to med-low, and add the eggplant, the olives, and the minced garlic. Stir and begin to reduce the liquid content. At this point, you can change the consistency of the mixture. Add more water if you want it juicier, or cook longer if you prefer it to be thicker. I added about 1/3 cup of water. Season the eggplant with salt and pepper, and continue cooking. I cooked the eggplant for about 15 minutes. Just before you have achieved the desired liquid content, add the tomatoes (which should contain little juice by this point) to the eggplant, and combine. Remove the pot from the heat, correct the seasonings, dribble a little more olive oil over the marmalade, and give in a last stir. My eggplant required a good deal of both salt and pepper.

Suggested Uses

-Chill the eggplant for a few hours, and eat it cold in pita, with some sliced cheese, bell peppers, and lettuce as a healthy sandwich.

-Double (or triple) the recipe, and serve it hot over pasta. I would suggest using a shell- or tube-shaped pasta which will "catch" more of the sauce. You may also want to increase the onion or tomato content.

-Serve it for breakfast with a poached egg on top.

-I haven't tried this, but I suspect that it would also be tasty with some spicy peppers and maybe a tablespoon or two of good-quality vinegar mixed in. Serve with a soft cheese and crackers for a snack.

Sunday, August 2, 2009

Budget Tricks - Poached Egg in a Cup


As the header above this blog title reveals, I am indeed an ex-college student. Though all of this seems to imply that I have earned a university diploma, suffered through microeconomics lectures with 250 people, and consumed one too many coffees in the library café, the real issue here is that I am now living off my own nickel. And this economy isn't throwing anyone a bone. I'm pretty good at budgeting, generally. I know what I spend, when I spend it, and how much I'm willing to shell out for each purchase. For example, when it comes to produce, I buy only what's in season, and I often shop at markets, which tend to have fruits and vegetables that are not only cheaper, but also more fresh. Because I'm a vegetarian and I have a somewhat insane addiction to raisins and peanuts - did I mention that I'm also weird? - I make a special trip to buy these items in bulk. When it comes to whole grains, tea, and salt, I'm always willing to pay a little extra for quality. [I have a whole system worked out for the purchasing of clothing as well. I almost always buy from the super clearance section, and I'm a huge fan of thrift stores. Running shoes though? I refuse to sacrifice my feet and knees to the pavement. I used to buy cheap sneakers, and my poor toes were so blistered everyday that they looked like they'd been run over by a car tire, which, had I not been so frugal, might also have led to additional purchases of bandages and tape. But I digress. Also, you'll probably never want to read about food if I continue discussing my feet].

Back to the issue at hand, I find that I'm happiest in the kitchen when I'm able to merge healthy eating, maximum flavor, and wallet-friendly shopping. Some of the ways I do this I mentioned above - making smart and seasonal purchases, taking an extra walk to go to the more reasonably priced store, but I also try to come up with creative uses for everyday foods. In this department, I have more than a few tricks up my sleeve. One of my very favorites, however, is to deploy the egg as not a mere addition to a meal, but as a protein-boosting, creamy sauce that replaces other sauces that are more expensive as well as high in sodium, sugar, and preservatives. There are a million ways to cook an egg (and I'm only exaggerating a little), but I've found that as a condiment, the poached egg works well. You'll have a soft and fleshy white that, when ladeled over your food, will break open so that the milky yolk can being used for dipping. The poached egg can be eaten over steamed broccoli, sauteed mushrooms, toast, skillet corn, couscous, salmon, you name it. In particular, I like to have it at lunch with a bowl of warm salsa, a fresh jalapeño, and a tortilla. Add some refried beans and you've got yourself a five-minute taco.

Which brings me to the "in a cup" part of the poaching. Poaching an egg can be a daunting task. It's a little tricky to slide the egg into hot water without letting the white go everywhere and create a stringy soup rather than a nicely rounded lump. If you get the poaching right, you'll come up with a beautifully-shaped egg, but I've found that when I'm cooking for myself, I almost always favor speed and convenience over presentation. Hence the poaching in a cup. Easy, fast, and versatile. Do it at home.


Poached Egg in a Cup
this recipe is for one egg

Ingredients

-water
-egg(s)
-salt and pepper to taste
-any other seasonings you like on your eggs, coordinate this part with whatever you're planning to serve with the egg

Method

Pour a couple of inches of water into a small pot. Over the stove, bring the water almost to the point of boiling. Once bubbles gather around the sides and bottom of the pot, reduce the heat to medium. In the meantime, crack an egg into a mug or a ramekin (or another dish that can withstand heat). Don't stir the egg - you do not want to break up the yolk. Top the egg with salt, pepper, and seasonings. Just after you have reduced the heat of the water, set the ramekin into the pot. You'll want the water to reach the level of the top of the egg, but you don't want any water to get into the ramekin itself. From here on, cooking time depends on how hot your water is. You'll want to remove the egg as soon as the white becomes opaque. This generally takes me about 2 minutes. Make sure when you remove the ramekin to use tongs or a towel because it will be quite hot. As soon as you've removed the egg from the heat, carefully slide it from the ramekin onto whatever you're serving it with. I ate mine with sauteed cauliflower, tomatoes, and feta. The egg won't stay warm long so eat it right away.* I break the egg into bits and often use bread or veggies to sop up the yolk.

*I hear the you can reheat a poached egg by placing it back into the hot water for a minute or so, but I've never tried this myself.